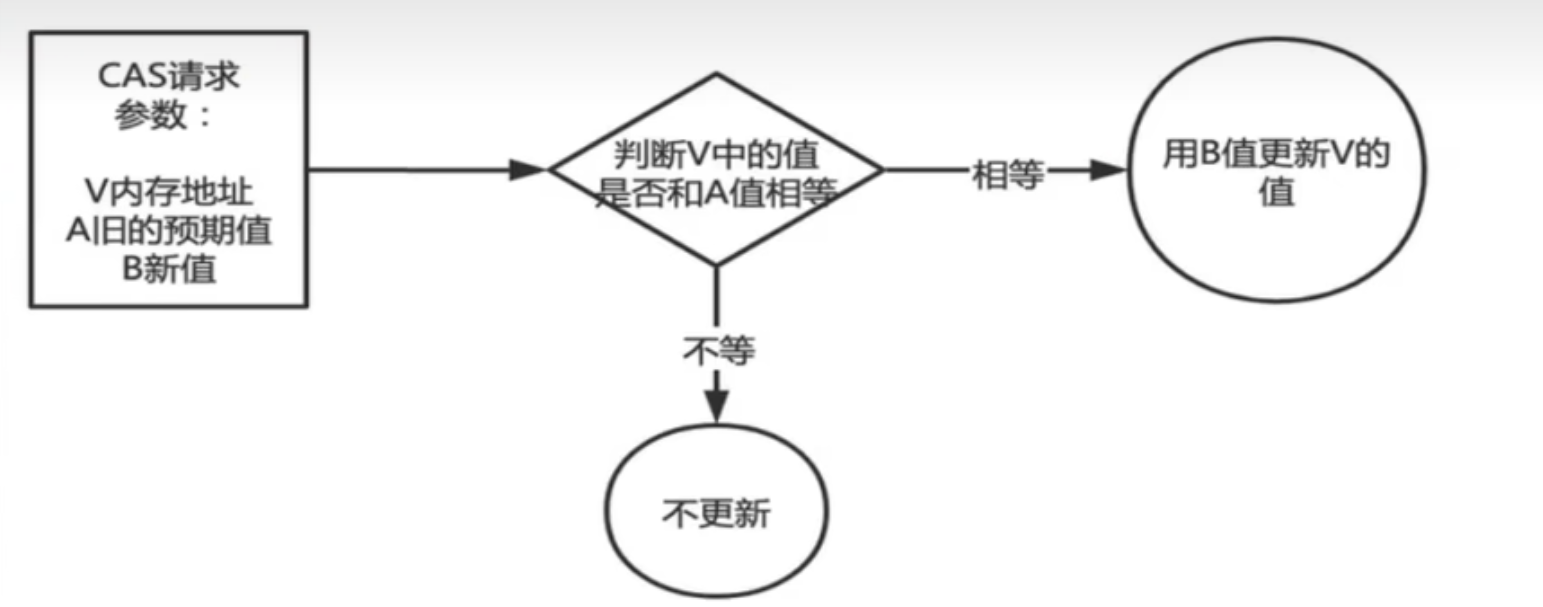
1. CAS 1.1 CAS概述 CAS(compare and swap),中文翻译为比较并交换,实现并发算法时常用到的一种技术,用于保证共享变量的原子性更新,它包含三个操作数—-内存位置、预期原值与更新值。
执行CAS操作的时候,将内存位置的值与预期原值进行比较:
如果相匹配,那么处理器会自动将该位置更新为新值
如果不匹配,处理器不做任何操作,多个线程同时执行CAS操作只有一个会成功。
CAS 有 3 个操作数,位置内存值 V,旧的预期值 A,要修改的更新值 B。当且仅当旧的预期值 A 和内存值 V 相同时,将内存值 V 修改为 B,否则什么都不做或重试。
重试的这种行为称为自旋 。原理有点类似乐观锁,修改带版本号。
1
2
3
4
5
6
7
8
9
public static void main (String[] args) {AtomicInteger atomicInteger = new AtomicInteger (5 );5 , 2022 ) + "\t" + atomicInteger.get());5 , 2023 ) + "\t" + atomicInteger.get());
CAS 是 JDK 提供的非阻塞 原子性操作,它通过硬件保证 了比较-更新的原子性。
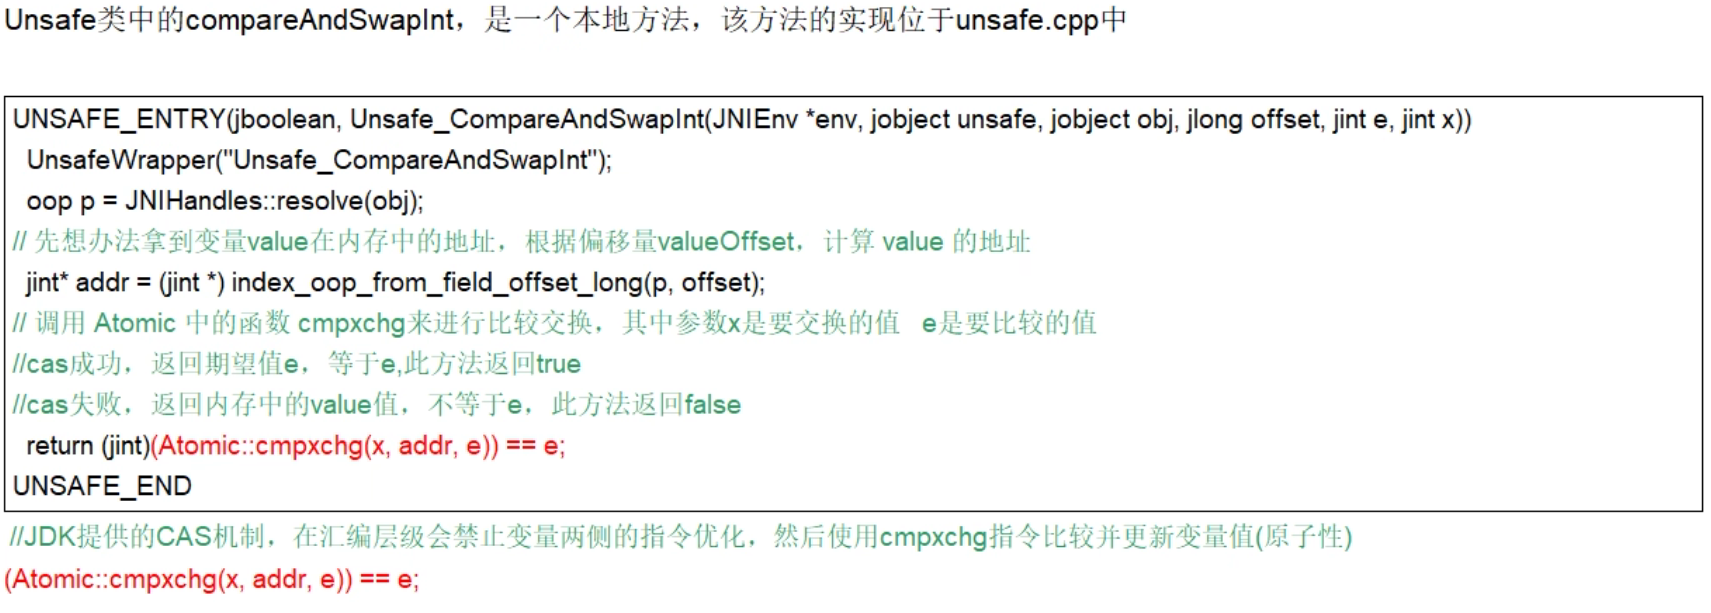
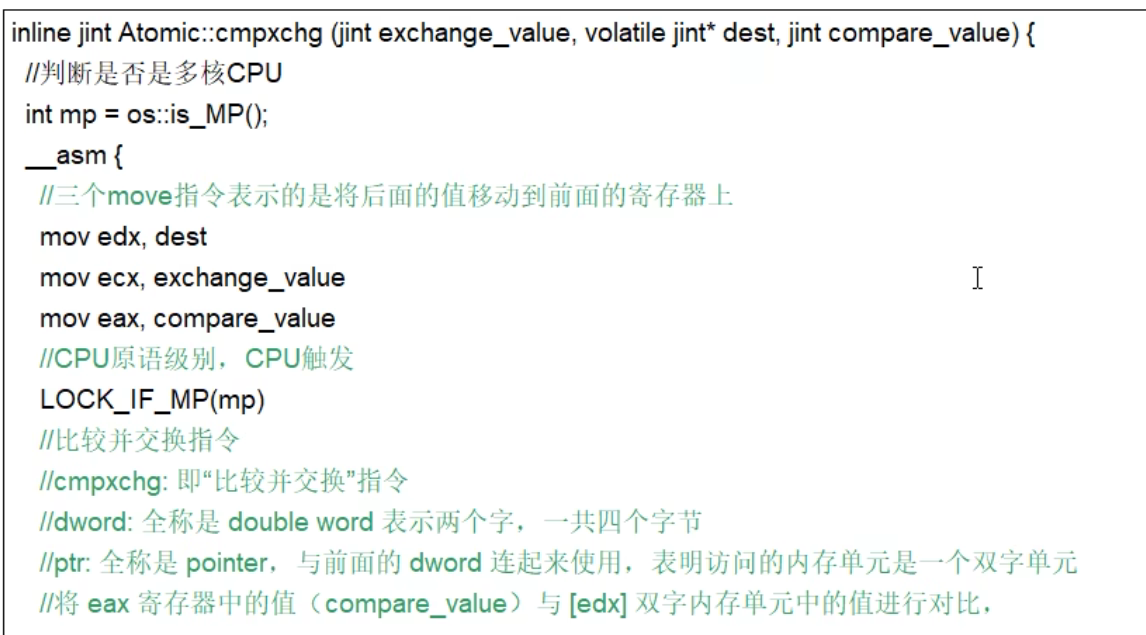
CAS 是一条 CPU 的原子指令(cmpxchg指令),不会造成所谓的数据不一致问题,Unsafe 提供的 CAS 方法(如compareAndSwapXXX)底层实现即为CPU指令cmpxchg
执行cmpxchg指令的时候,会判断当前系统是否为多核系统,如果是就给总线加锁 ,只有一个线程会对总线加锁成功,加锁成功之后会执行 CAS 操作,也就是说 CAS 的原子性实际上是 CPU 实现独占的 ,比起用 synchronized 重量级锁,这里的排他时间要短很多,所以在多线程情况下性能会比较好。
底层源码
1
2
3
4
5
public final native boolean compareAndSwapObject (Object var1, long var2, Object var4, Object var5) ;public final native boolean compareAndSwapInt (Object var1, long var2, int var4, int var5) ;public final native boolean compareAndSwapLong (Object var1, long var2, long var4, long var6) ;
var1: 表示要操作的对象
var2: 表示要操作对象中属性地址的偏移量
var4: 预期原值
var5/6: 更新值
原子类靠的是CAS思想,CAS思想实现靠的是Unsafe类。工作中尽量不要使用UnSafe类,使用不当容易出现问题
1.2 CAS原理 Unsafe Unsafe 是 CAS 的核心类,由于 Java 方法无法直接访问底层系统,需要通过本地(native)方法来访问,Unsafe 相当于一个后门,基于该类可以直接操作特定内存的数据。Unsafe 类存在于 sun.misc 包中,其内部方法操作可以像 C 的指针一样直接操作内存,因此 Java 中 CAS 操作的执行依赖于 Unsafe 类的方法。
注意:Unsafe类中的所有方法都是native修饰的,也就是说Unsafe类中的所有方法都直接调用操作系统底层资源执行相应任务
1
2
3
4
5
6
7
8
9
10
11
12
13
14
15
16
public class AtomicInteger extends Number implements java .io.Serializable {private static final long serialVersionUID = 6214790243416807050L ;private static final Unsafe unsafe = Unsafe.getUnsafe();private static final long valueOffset;static {try {"value" ));catch (Exception ex) { throw new Error (ex); }private volatile int value;
valueOffset 表示该变量值在内存中的偏移地址,因为 Unsafe 就是根据内存偏移地址获取数据的value 用 volatile 修饰,保证多线程的可见性
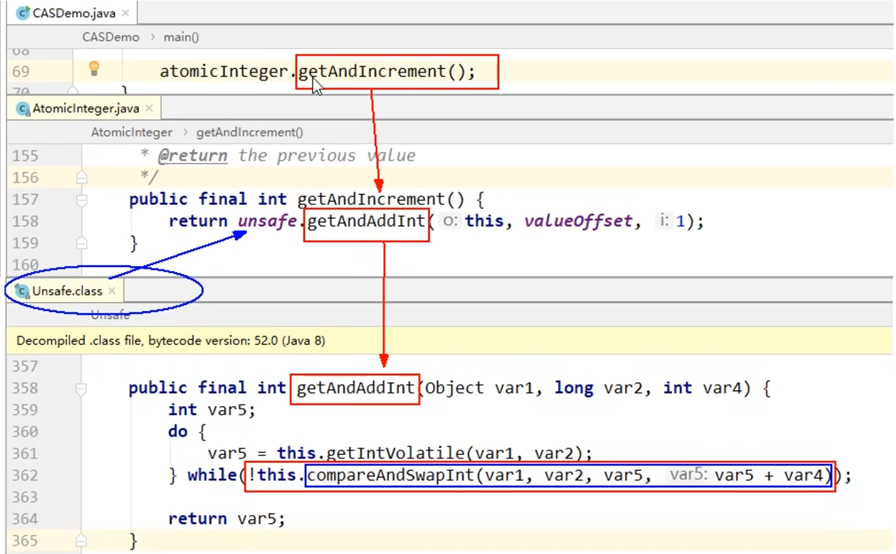
问题:我们知道 i++ 是线程不安全的,那 AtomicInteger.getAndIncrement() 如何保证原子性?
AtomicInteger 类主要利用 CAS + volatile 和 native 方法来保证原子操作,从而避免 synchronized 的高开销,执行效率大为提升
CAS 并发原语体现在 Java 语言中就是 sun.misc.Unsafe 中的各个方法。调用 Unsafe 类中的 CAS 方法,JVM 会帮我们实现出 CAS 汇编指令。这是一种完全依赖于硬件的功能,通过它实现了原子操作。再次强调,由于 CAS 是一种系统原语,原语属于操作系统用语范畴,是由若干条指令组成的,用于完成某个功能的一个过程,并且原语的执行必须是连续的,在执行过程中不允许被中断,也就是说 CAS 是一条 CPU 的原子指令,不会造成所谓的数据不一致问题。
源码分析 假设线程 A 和线程 B 两个线程同时执行 getAndAddInt 操作(分别跑在不同CPU上):
AtomicInteger 里面的 value 原始值为 3,即主内存中 AtomicIntegeri 的 value 为 3,根据 JMM 模型,线程 A 和线程 B 各自持有一份值为 3 的 value 的副本分别到各自的工作内存
线程 A 通过 getIntVolatile(var1, var2) 拿到 value 值 3,这时线程 A 被挂起
线程 B 也通过 getIntVolatile(var1, var2) 方法获取到 value 值 3,此时刚好线程 B 没有被挂起并执行 compareAndSwapInt 方法比较内存值也为 3,成功修改内存值为 4
这时线程 A 恢复,执行 compareAndSwapInt 方法比较,发现自己手里的值数字 3 和主内存的值数字 4 不一致,说明该值已经被其它线程抢先一步修改过了,那 A 线程本次修改失败,只能重新读取重新来一遍了
线程 A 重新获取 value 值,因为变量 value 被 volatile 修饰,所以其它线程对它的修改,线程 A 总是能够看到,线程 A 继续执行 compareAndSwapInt 进行比较替换,直到成功。
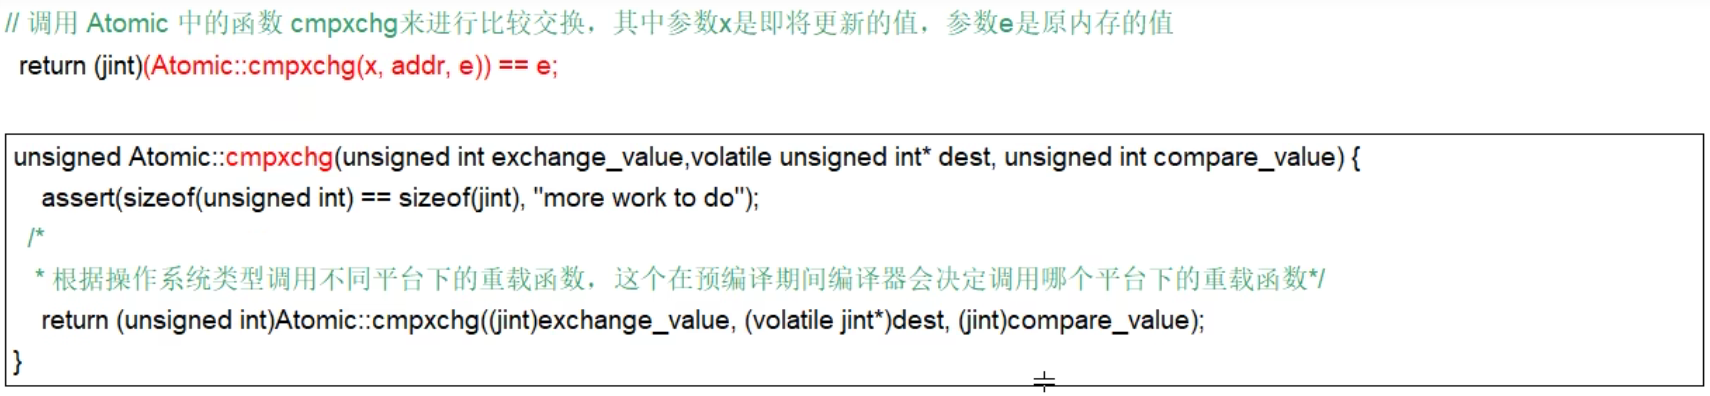
以 WIN10 为例
总结:
CAS 是靠硬件实现的从而在硬件层面提升效率,最底层还是交给硬件来保证原子性和可见性
实现方式是基于硬件平台的汇编指令,在 intel 的 CPU 中,使用的是汇编指令 compxchg 指令
核心思想就是比较要更新变量 V 的值和预期值 E,相等才会将 V 的值设为新值 N,如果不相等自旋再来
1.3 原子引用 AtomicReference 1 2 3 4 5 6 7 8 9 10 11 12 13 14 15 16 17 18 19 20 21 22 23 @Data @AllArgsConstructor @NoArgsConstructor class User {int age;public class AtomicReferenceDemo {public static void main (String[] args) {new AtomicReference <>();User z3 = new User ("z3" , 22 );User li4 = new User ("li4" , 25 );"\t" + atomicReference.get().toString());"\t" + atomicReference.get().toString());
1.4 CAS与自旋锁 CAS 是实现自旋锁的基础,CAS 利用 CPU 指令保证了操作的原子性,以达到锁的效果,至于自旋锁是指尝试获取锁的线程不会立即阻塞 ,而是采用循环的方式去尝试获取锁 ,当线程发现锁被占用时,会不断循环判断锁的状态,直到获取。这样的好处是减少线程上下文切换的消耗,缺点是循环会消耗 CPU
例如 Unsafe#getAndAddInt 方法中的 do-while 循环, 当操作成功返回 true 时,循环结束; 当返回 false 时,接着执行循环,继续尝试CAS操作,直到返回true
自己实现一个自旋锁
通过 CAS 完成自旋锁,A 线程先进来调用 myLock 方法自己持有锁 5 秒钟,B 随后进来后发现当前有线程持有锁,所以只能通过自旋等待,直到 A 释放锁后 B 随后抢到。
1 2 3 4 5 6 7 8 9 10 11 12 13 14 15 16 17 18 19 20 21 22 23 24 25 26 27 28 29 30 31 32 33 34 35 36 37 38 39 40 41 42 43 44 45 46 47 48 49 public class SpinLockDemo {new AtomicReference <>();public void lock () {Thread thread = Thread.currentThread();"\t come in" );while (!atomicReference.compareAndSet(null , thread)) {}"\t set successfully" );public void unlock () {Thread thread = Thread.currentThread();null );"\t task over, unLock" );public static void main (String[] args) {SpinLockDemo spinLockDemo = new SpinLockDemo ();new Thread (() -> {try {3 );catch (InterruptedException e) {throw new RuntimeException (e);"A" ).start();try {500 );catch (InterruptedException e) {new Thread (() -> {"B" ).start();
如果还想支持可重入,可以增加一个 int 成员变量作为计数器
https://learnku.com/articles/49689
1.5 ABA问题 CAS 的缺点
如果 CAS 失败,会一直进行尝试,长时间不成功会给 CPU 带来很大的开销
CAS 会导致 “ABA问题”
ABA 问题是如何产生的
CAS 算法实现一个重要前提是取出内存中某时刻的数据并在当下时刻比较并替换,那么在这个时间差 类会导致数据的变化
比如说一个线程 1 从内存位置 V 中取出 A,这时候另一个线程 2 也从内存中取出 A,并且线程2 进行了一些操作将值变成了 B,然后线程 2 又将 V 位置的数据变成 A,这时候线程 1 进行 CAS 操作发现内存中仍然是 A,预期OK,然后线程 1 操作成功
尽管线程 1 的 CAS 操作成功,但是不代表这个过程就是没有问题的
解决方法
1 2 3 4 5 6 7 8 9 10 11 12 13 14 15 16 17 18 19 20 21 22 23 24 25 26 27 28 29 30 31 32 33 34 35 36 37 38 39 40 41 42 43 44 45 46 47 48 49 50 51 52 53 54 55 56 57 58 59 60 61 62 63 64 65 66 67 68 public class ABADemo {static AtomicInteger atomicInteger = new AtomicInteger (100 );static AtomicStampedReference<Integer> atomicStampedReference = new AtomicStampedReference <>(100 , 1 );public static void main (String[] args) {private static void abaNoHappen () {new Thread (() -> {int stamp = atomicStampedReference.getStamp();"\t" + "首次版本号: " + stamp);try {500 );catch (InterruptedException e) {100 , 101 , atomicStampedReference.getStamp(), atomicStampedReference.getStamp() + 1 );"\t" + "2次版本号: " + atomicStampedReference.getStamp());101 , 100 , atomicStampedReference.getStamp(), atomicStampedReference.getStamp() + 1 );"\t" + "3次版本号: " + atomicStampedReference.getStamp());"t3" ).start();new Thread (() -> {int stamp = atomicStampedReference.getStamp();"\t" + "首次版本号: " + stamp);try {1 );catch (InterruptedException e) {boolean b = atomicStampedReference.compareAndSet(100 , 200 , stamp, stamp + 1 );"\t" + atomicStampedReference.getReference() + "\t" + atomicStampedReference.getStamp());"t4" ).start();private static void abaHappen () {new Thread (() -> {100 , 101 );try {10 );catch (InterruptedException e) {101 , 100 );"t1" ).start();new Thread (() -> {try {200 );catch (InterruptedException e) {100 , 2023 ) + "\t" + atomicInteger.get());"t2" ).start();
2. 原子操作类
2.1 基本类型原子类 AtomicInteger, AtomicBoolean, AtomicLong
常用API:
1 2 3 4 5 6 7 public final int get () public final int getAndSet (int newValue) public final int getAndIncrement () public final int getAndDecrement () public final int getAndAdd (int delta) boolean compareAndSet (int expect, int update) public final void lazySet (int newValue)
Case:
1 2 3 4 5 6 7 8 9 10 11 12 13 14 15 16 17 18 19 20 21 22 23 24 25 26 27 28 29 30 31 class MyNumber {AtomicInteger atomicInteger = new AtomicInteger ();public void addPlusPlus () {public class AtomicIntegerDemo {public static final int SIZE = 50 ;public static void main (String[] args) throws InterruptedException {MyNumber myNumber = new MyNumber ();CountDownLatch countDownLatch = new CountDownLatch (SIZE);for (int i = 1 ; i <= SIZE; i++) {new Thread (() -> {try {for (int j = 1 ; j <= 10 ; j++) {finally {"\t" + "result: " + myNumber.atomicInteger.get());
CountDownLatch 最佳实践:使用带有超时时间的 await 方法,通过判断count是否大于0,来判断是执行完毕还是代码超时。比起不带超时的await方法,优点在于等待时间可控,不会因意外一直等待。
2.2 数组类型原子类 AtomicIntegerArray, AtomicLongArray, AtomicReferenceArray
常用API:
1 2 3 4 5 6 7 public final int get (int i) public final int getAndSet (int i, int newValue) public final int getAndIncrement (int i) public final int getAndDecrement (int i) public final int getAndAdd (int i, int delta) boolean compareAndSet (int i, int expect, int update) public final void lazySet (int i, int newValue)
Case:
AtomicIntegerArray初始化必须指定数组或数组长度
1 2 3 4 5 6 7 8 9 10 11 public static void main (String[] args) {AtomicIntegerArray atomicIntegerArray = new AtomicIntegerArray (new int [5 ]);for (int i = 0 ; i < atomicIntegerArray.length(); i++){AtomicIntegerArray array = new AtomicIntegerArray (new int []{1 ,2 ,3 ,4 ,5 });0 , 999 );0 )); 4 );4 ));
2.3 引用类型原子类
Case:
1 2 3 4 5 6 7 8 9 10 11 12 13 14 15 16 17 18 19 20 21 22 23 24 25 26 27 28 29 30 public class AtomicMarkableReferenceDemo {static AtomicMarkableReference<Integer> markableReference = new AtomicMarkableReference <>(100 , false );public static void main (String[] args) {new Thread (() -> {boolean marked = markableReference.isMarked();"\t" + "默认标识: " + marked); try {1 );catch (InterruptedException e) {100 , 1000 , marked, !marked);"t1" ).start();new Thread (() -> {boolean marked = markableReference.isMarked();"\t" + "默认标识: " + marked);try {2 );catch (InterruptedException e) {boolean b = markableReference.compareAndSet(100 , 2000 , marked, !marked);"\t" + "t2线程CASResult:" + b);"\t" + markableReference.isMarked());"\t" + markableReference.getReference());"t2" ).start();
2.4 对象的属性修改原子类
AtomicIntegerFieldUpdater:原子更新对象中int类型字段的值AtomicLongFieldUpdater:原子更新对象中Long类型字段的值AtomicReferenceFieldUpdater:原子更新对象中引用类型字段的值
使用目的: 以一种线程安全的方式操作非线程安全对象内的某些字段
使用要求:
更新的对象属性必须使用 public volatile 修饰符
因为对象的属性修改类型原子类都是抽象类,所以每次使用都必须使用静态方法 newUpdater() 创建一个更新器,并且需要设置想要更新的类和属性
AtomicIntegerFieldUpdater Case:
1 2 3 4 5 6 7 8 9 10 11 12 13 14 15 16 17 18 19 20 21 22 23 24 25 26 27 28 29 30 31 32 33 34 class BankAccount {public volatile int money = 0 ;"money" );public void transferMoney (BankAccount bankAccount) {public class AtomicIntegerFieldUpdaterDemo {public static void main (String[] args) throws InterruptedException {BankAccount bankAccount = new BankAccount ();CountDownLatch countDownLatch = new CountDownLatch (10 );for (int i = 1 ; i <= 10 ; i++) {new Thread (() -> {try {for (int j = 1 ; j <= 1000 ; j++) {finally {1 , TimeUnit.SECONDS);if (countDownLatch.getCount() > 0 ) {"============执行超时============" );return ;'\t' + "result: " + bankAccount.money);
AtomicReferenceFieldUpdater Case:
1 2 3 4 5 6 7 8 9 10 11 12 13 14 15 16 17 18 19 20 21 22 23 24 25 26 27 28 29 30 31 32 33 34 35 36 37 38 39 40 41 class MyVar {public volatile Boolean isInit = Boolean.FALSE;"isInit" );public void init () {if (referenceFieldUpdater.compareAndSet(this , Boolean.FALSE, Boolean.TRUE)) {"\t" + "--------------start init ,need 2 seconds" );try {2 );catch (InterruptedException e) {"\t" + "--------------over init" );else {"\t" + "--------------已经有线程进行初始化工作了。。。。。" );public class AtomicReferenceFieldUpdaterDemo {public static void main (String[] args) {MyVar myVar = new MyVar ();for (int i = 1 ; i <= 5 ; i++) {new Thread (myVar::init, String.valueOf(i)).start();
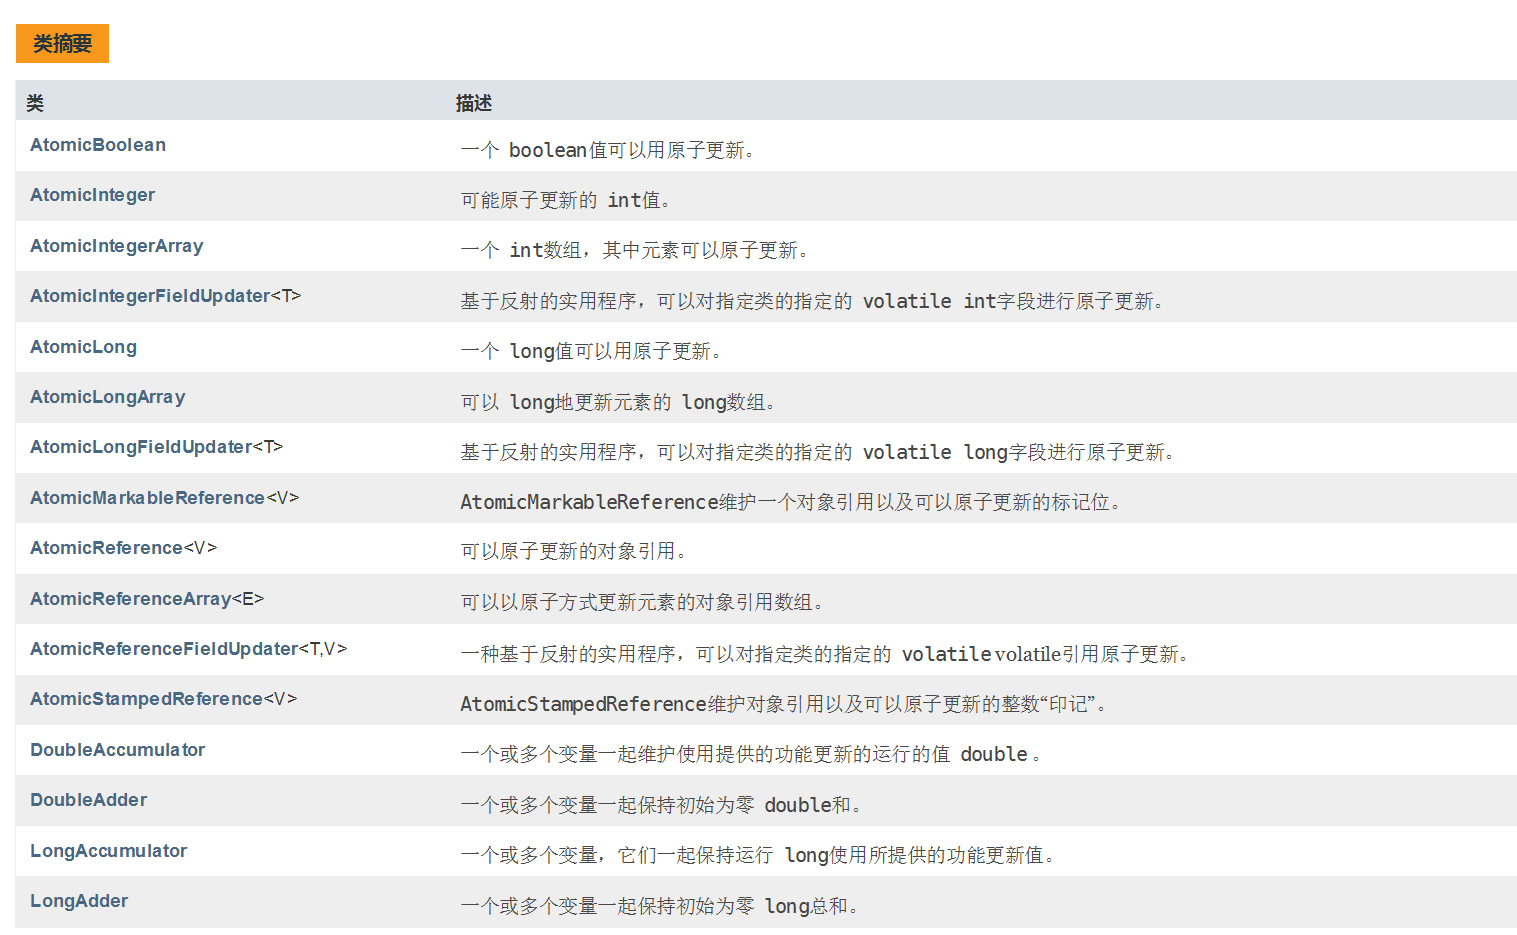
2.5 原子操作增强类
DoubleAccumulator:一个或多个变量共同维护使用提供的函数更新的运行 double 值DoubleAdder:一个或多个变量共同维护最初的零和 double 总和LongAccumulator:一个或多个变量共同维护使用提供的函数更新的运行 double 值,提供了自定义的函数操作LongAdder:一个或多个变量共同维护最初的零和 long 总和,只能用来计算加法,且从 0 开始计算
面试题:
热点商品点赞计算器,点赞数加加统计,不要求实时精确
一个很大的list,里面都是int类型,如何实现加加,思路?
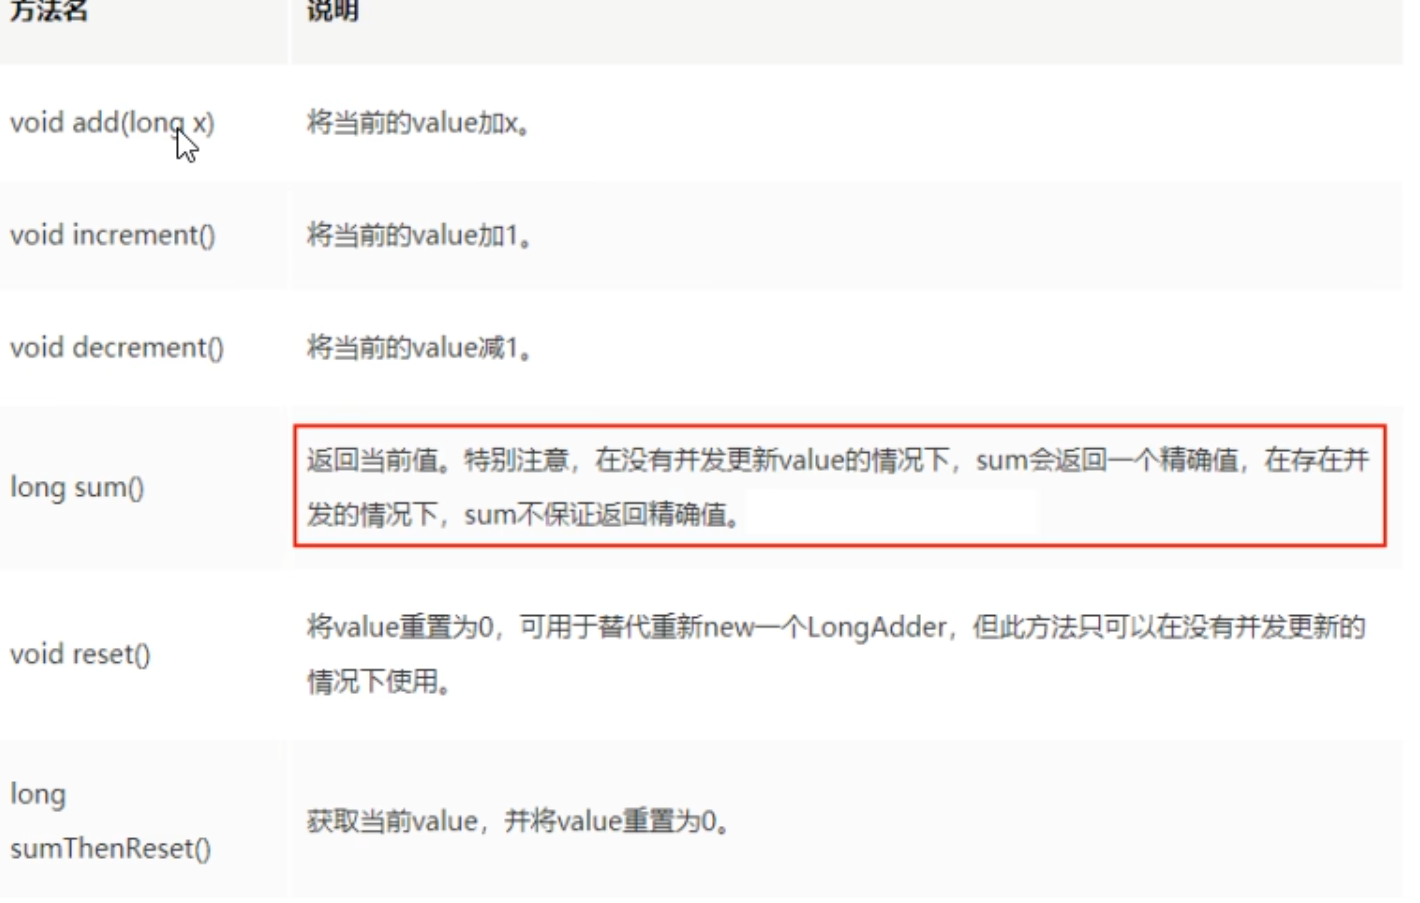
以 LongAdder 为例,常用API:
LongAdder, LongAccumulator Case:
1 2 3 4 5 6 7 8 9 10 11 12 13 public static void main (String[] args) {LongAdder longAdder = new LongAdder ();3 );LongAccumulator longAccumulator = new LongAccumulator ((x, y) -> x - y,0 );6 ); 2 );
比较不同方式实现高并发点赞消耗时间
1 2 3 4 5 6 7 8 9 10 11 12 13 14 15 16 17 18 19 20 21 22 23 24 25 26 27 28 29 30 31 32 33 34 35 36 37 38 39 40 41 42 43 44 45 46 47 48 49 50 51 52 53 54 55 56 57 58 59 60 61 62 63 64 65 66 67 68 69 70 71 72 73 74 75 76 77 78 79 80 81 82 83 84 85 86 87 88 89 90 91 92 93 94 95 96 97 98 99 100 101 102 103 104 105 106 107 108 109 class ClickNumber {int number = 0 ;public synchronized void clickBySynchronized () {AtomicLong atomicLong = new AtomicLong (0 );public void clickByAtomicLong () {LongAdder longAdder = new LongAdder ();public void clickByLongAdder () {LongAccumulator longAccumulator = new LongAccumulator (Long::sum, 0 );public void clickByLongAccumulator () {1 );public class AccumulatorCompareDemo {public static final int _100W = 1000000 ;public static final int THREAD_NUMBER = 50 ;public static void main (String[] args) throws InterruptedException {ClickNumber clickNumber = new ClickNumber ();long startTime;long endTime;CountDownLatch countDownLatch1 = new CountDownLatch (THREAD_NUMBER);CountDownLatch countDownLatch2 = new CountDownLatch (THREAD_NUMBER);CountDownLatch countDownLatch3 = new CountDownLatch (THREAD_NUMBER);CountDownLatch countDownLatch4 = new CountDownLatch (THREAD_NUMBER);for (int i = 0 ; i < THREAD_NUMBER; i++) {new Thread (() -> {try {for (int j = 0 ; j < _100W; j++) {finally {"costTime: " + (endTime - startTime) + " 毫秒" + "\t clickBySynchronized: " + clickNumber.number);for (int i = 0 ; i < THREAD_NUMBER; i++) {new Thread (() -> {try {for (int j = 0 ; j < _100W; j++) {finally {"costTime: " + (endTime - startTime) + " 毫秒" + "\t clickByAtomicLong: " + clickNumber.atomicLong.get());for (int i = 0 ; i < THREAD_NUMBER; i++) {new Thread (() -> {try {for (int j = 0 ; j < _100W; j++) {finally {"costTime: " + (endTime - startTime) + " 毫秒" + "\t clickByLongAdder: " + clickNumber.longAdder.sum());for (int i = 0 ; i < THREAD_NUMBER; i++) {new Thread (() -> {try {for (int j = 0 ; j < _100W; j++) {finally {"costTime: " + (endTime - startTime) + " 毫秒" + "\t clickByLongAccumulator: " + clickNumber.longAccumulator.get());
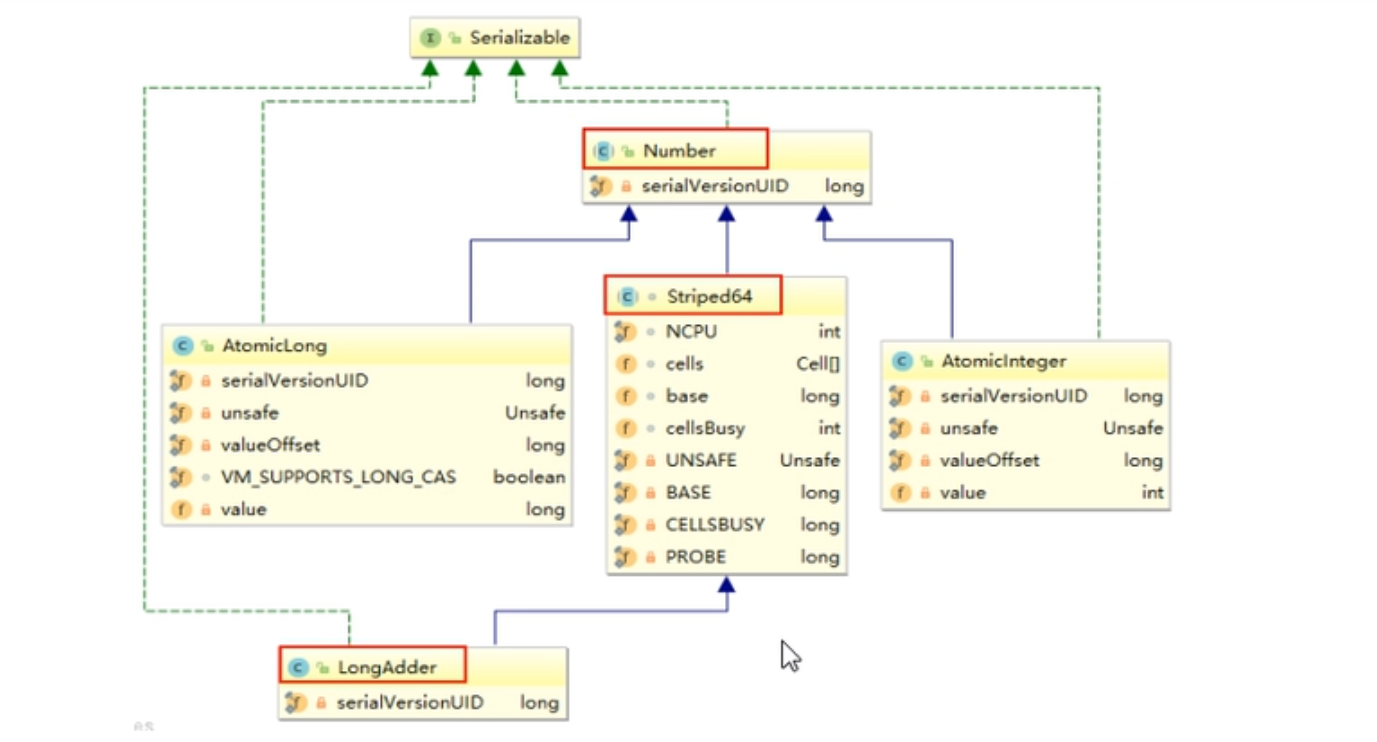
2.6 原子操作增强类原理解析 架构
LongAdder 是 Striped64 的子类
如果是JDK8,推荐使用 LongAdder 对象,比 AtomicLong 性能更好(减少乐观锁的重试次数)
低更新争用下,LongAdder 与 AtomicLong 具有相似的特征;但在高争用的情况下,LongAdder 预期吞吐量明显更高,但代价是空间消耗更高
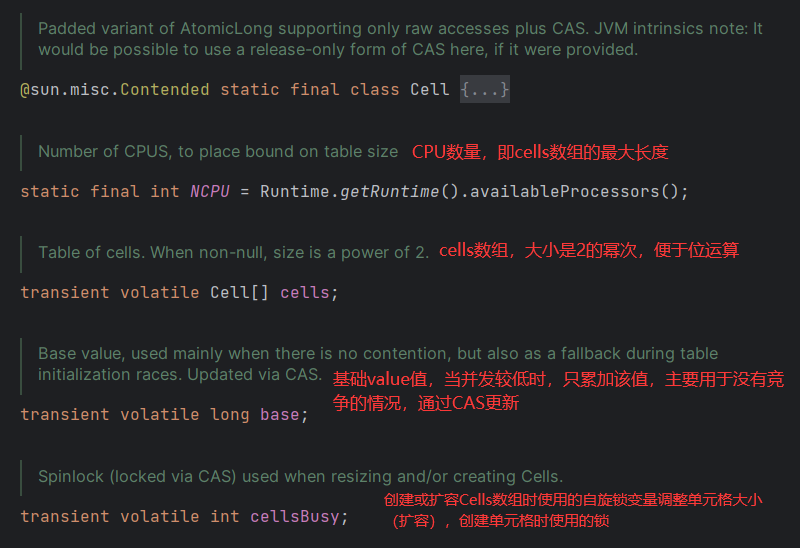
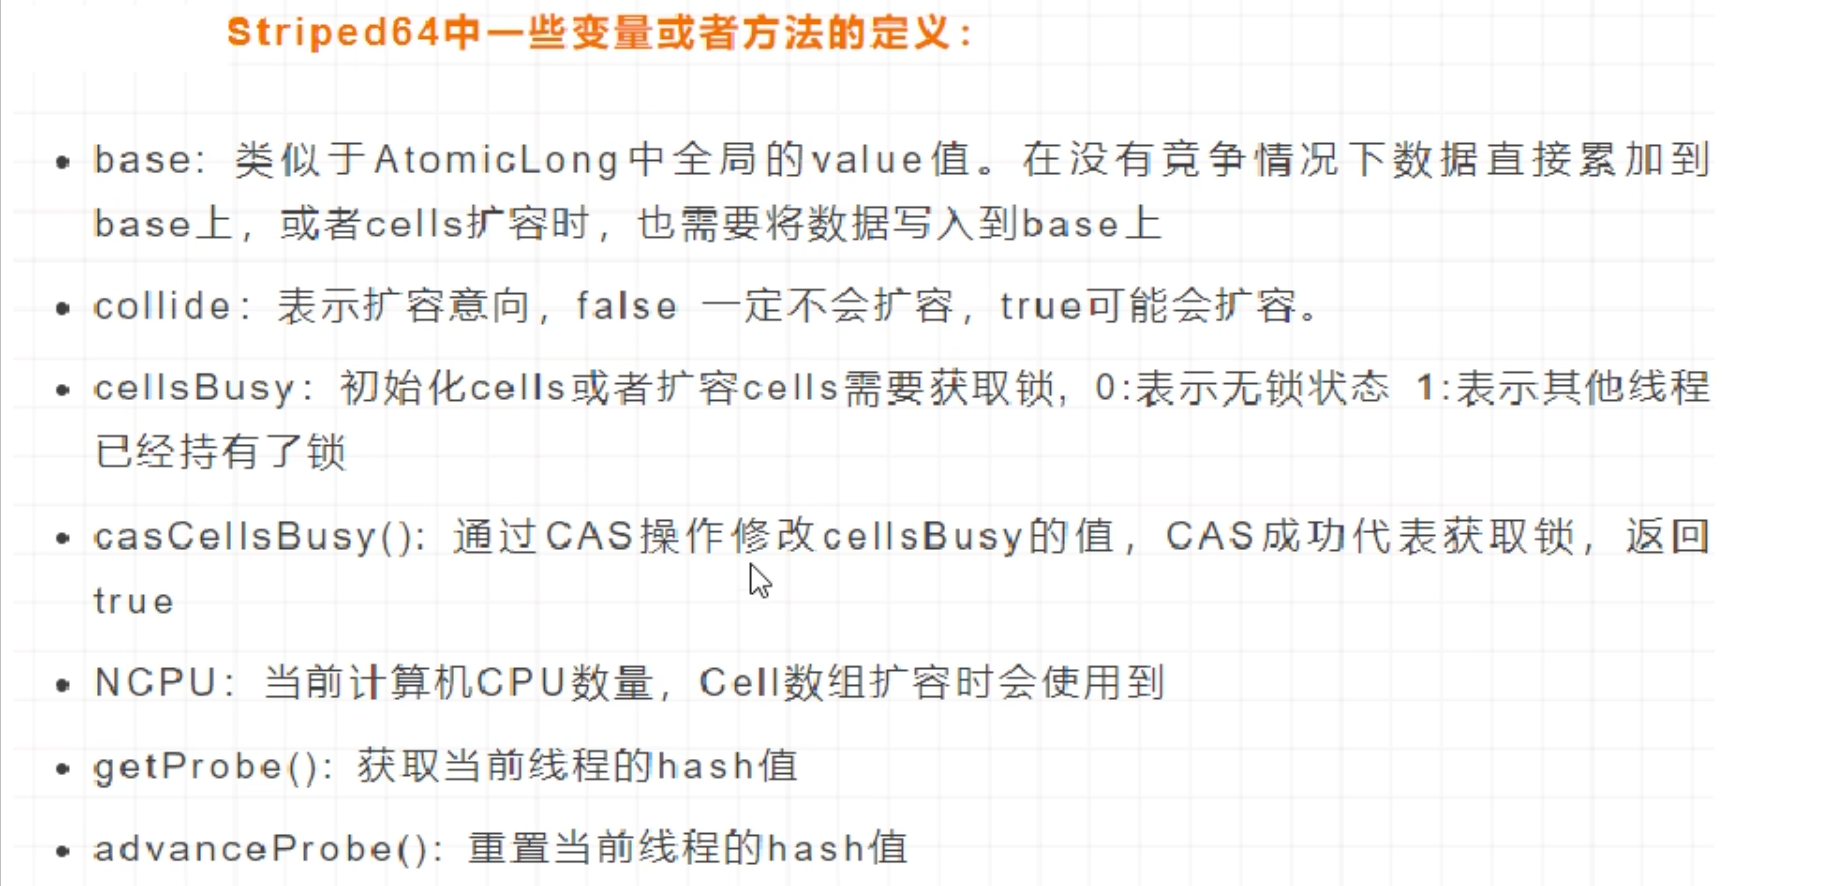
Striped64 关键内部类与成员变量
Cell 是 java.util.concurrent.atomic 下 Striped64 的一个内部类
1 2 3 4 5 6 7 8 9 10 11 12 13 14 15 16 17 18 19 20 21 @sun .misc.Contended static final class Cell {volatile long value;long x) { value = x; }final boolean cas (long cmp, long val) {return UNSAFE.compareAndSwapLong(this , valueOffset, cmp, val);private static final sun.misc.Unsafe UNSAFE;private static final long valueOffset;static {try {"value" ));catch (Exception e) {throw new Error (e);
@sun.misc.Contended 用于避免伪共享 , 单独占一个缓存行
LongAdder 为什么这么快
LongAdder 的基本思路就是分散热点 ,将 value 值分散到一个 Cell 数组中,不同线程会命中到数组的不同槽中,各个线程只对自己槽中的那个值进行 CAS 操作,这样热点就被分散了,冲突的概率就小很多,如果要获取真正的 long 值,只要将各个槽中的变量值累加返回
sum() 会将所有的 Cell 数组中的 value 和 base 累加作为返回值 ,核心的思想就是将之前 AtomicLong 一个 value 的更新压力分散到多个 value 中去,从而降级更新热点。
内部有一个base变量,一个Cell[]数组
$Sum = Base + \textstyle\sum_{i=1}^nCell[i].value$
源码分析 LongAdder 在无竞争的情况下,跟 AtomicLong 一样,对同一个 base 进行操作,当出现竞争关系时则是采用化整为零分散热点的做法,用空间换时间,用一个数组 cells,将一个 value 值拆分进这个数组 cells。多个线程需要同时对 value 进行操作的时候,可以对线程 id 进行 hash 得到 hash 值,再根据 hash 值映射到这个数组 cells 的某个下标,再对该下标所对应的值进行自增操作。当所有线程操作完毕,将数组 cells 的所有值和 base 都加起来作为最终结果
以 increment 为例
1 2 3 4 5 6 public void increment () {1L );
add 1 2 3 4 5 6 7 8 9 10 11 12 13 14 15 16 17 public void add (long x) {long b, v; int m; Cell a;if ((as = cells) != null || !casBase(b = base, b + x)) {boolean uncontended = true ;if (as == null || (m = as.length - 1 ) < 0 ||null ||null , uncontended);
单线程时 cells 为 null, 运行 casBase, 即只修改 base 值, 随后就结束方法
如果出现了多线程, casBase 可能返回 false, 执行 if 内部
默认 uncontended = true, 没有冲突, as == null 为真, 执行 longAccumulate,初始化创建大小为 2 的Cell数组
接下来执行 add 方法因为 as 不再为 null, 会直接执行 if 内部
a = as[getProbe() & m]) == null 会判断 Cell 数组中的某个下标处是否为空如果为空, 执行 longAccumulate, uncontended 为 ture
如果不为空, 执行 !(uncontended = a.cas(v = a.value, v + x))
将该槽位中的值加 x, 如果成功执行了, 则 uncontended 为 true, 方法结束
如果出现了冲突, uncontended 为 false, 执行 longAccumulate, 要进行扩容
条件递增,逐步解析
最初无竞争只更新 base
如果更新 base 失败后,首次新建 Cell 数组
当多个线程竞争同一个 Cell 比较激烈时,可能需要对 Cell 数组扩容
longAccumulate 1 2 3 4 5 6 7 8 9 10 11 12 13 14 15 16 17 18 19 20 21 22 23 24 25 26 27 28 29 30 31 32 33 34 35 36 37 38 39 40 41 42 43 44 45 46 47 48 49 50 51 52 53 54 55 56 57 58 59 60 61 62 63 64 65 66 67 68 69 70 71 72 73 74 75 76 77 78 79 80 81 82 83 84 85 86 87 88 89 90 91 92 93 94 95 96 97 98 99 100 101 102 103 final void longAccumulate (long x, LongBinaryOperator fn, boolean wasUncontended) {int h;if ((h = getProbe()) == 0 ) { true ;boolean collide = false ; for (;;) {int n; long v;if ((as = cells) != null && (n = as.length) > 0 ) {if ((a = as[(n - 1 ) & h]) == null ) {if (cellsBusy == 0 ) { Cell r = new Cell (x); if (cellsBusy == 0 && casCellsBusy()) {boolean created = false ;try { int m, j;if ((rs = cells) != null &&0 &&1 ) & h] == null ) {true ;finally {0 ;if (created)break ;continue ; false ;else if (!wasUncontended) true ; else if (a.cas(v = a.value, ((fn == null ) ? v + x :break ;else if (n >= NCPU || cells != as)false ; else if (!collide)true ;else if (cellsBusy == 0 && casCellsBusy()) { try {if (cells == as) { new Cell [n << 1 ];for (int i = 0 ; i < n; ++i)finally {0 ;false ;continue ; else if (cellsBusy == 0 && cells == as && casCellsBusy()) {boolean init = false ;try { if (cells == as) { new Cell [2 ]; 1 ] = new Cell (x);true ;finally {0 ;if (init)break ;else if (casBase(v = base, ((fn == null ) ? v + x :break ;
首先给当前线程分配一个 hash 值,然后进入一个 for(;;)自旋,分为三个分支
CASE1: cells已经被初始化了,其中又分为了 6 个 if 语句
判断了当前线程 hash 后指向的数据位置元素是否为空,如果空则将Cell数据放入数组,跳出循环,不空则继续循环
wasUncontended 表示 cells 初始化后,当前线程竞争修改失败,这里只是将其设置为 true,紧接着执行 advanceProbe(h) 重置当前线程的 hash,重新循环
说明当前线程对应的数组中有了数据,也重置过 hash 值,这时通过 CAS 对当前数中的 value 进行累加 x 操作,如果 CAS 成功则跳出循环
如果 n 大于 CPU 最大数量,不可扩容,并通过 advanceProbe(h) 重置 hash,重新循环
如果扩容意向 collide 为 false 则修改为 true,然后重新计算线程 hash 继续循环。
扩容
CASE2: cells没有加锁且没有初始化,则尝试对他进行加锁,并初始化cells数组
CASE3: cells正在进行初始化,则尝试直接在基数base上进行累加操作
sum 1 2 3 4 5 6 7 8 9 10 11 12 13 14 15 16 17 18 19 20 public long sum () {long sum = base;if (as != null ) {for (int i = 0 ; i < as.length; ++i) {if ((a = as[i]) != null )return sum;
sum() 会将所有 Cell 数组中的 value 和 base 累加作为返回值。核心思想就是将之前 AtomicLong 一个 value 的更新压力分散到多个 value 中去,从而降级更新热点。
sum() 执行时,并没有限制对 base 和 cells 的更新,所以 LongAdder 不是强一致性的,它是最终一致性的
总结 AtomicLong
原理:CAS + 自旋
场景:低并发下的全局计算,AtomicLong 能保证并发情况下计数的准确性,其内部通过 CAS 来解决并发安全性问题
缺陷:高并发后性能急剧下降:AtomicLong 的自旋会成为瓶颈 (N 个线程 CAS 操作修改线程的值,每次只有一个成功过,其他 N-1 失败,失败的不停自旋直至成功,这样大量失败自旋的情况,一下子 CPU 就打高了)
LongAdder
原理:CAS + Base + Cell数组分散 (空间换时间并分散了热点数据)
场景:当需要在高并发下有较好的性能表现,且对值的精确度要求不高时,可以使用。保证性能,精度代价
缺陷:sum 求和后还有计算线程修改结果的话,最后结果不够准确